|
THE SQUARE THAT BROKE, OR DID IT?
by Samantha Wyndham
|
In January 1886, Lieutenant-Colonel the Hon Reginald Talbot of the 1st Life Guards published an article entitled ‘The Battle of Abu Klea’ in the monthly journal The Nineteenth Century. The battle had been fought in Sudan on 17th January 1885, when an estimated force of 12,000 Arabs attacked Brigadier-General Sir Herbert Stewart’s camel-mounted column of about 1,100 British soldiers. Stewart’s men were engaged in a forced march across the Bayuda desert in an ultimately unsuccessful attempt to rescue Major General Charles Gordon, besieged since April 1884 in Khartoum by the Sudanese forces of Mohammad Ahmad, the self-proclaimed ‘Mahdi’. Talbot’s article confined itself to the part played by the Heavy Camel Regiment, which he had commanded, and which he felt had been misrepresented in earlier accounts of the battle.
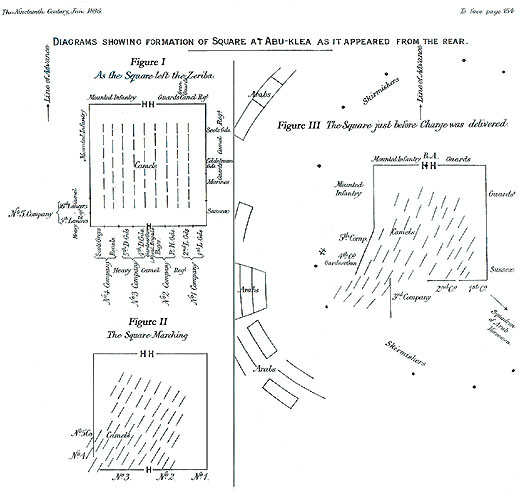 |
Stewart had known since noon on 16th January that the enemy were located in force ahead of him, on the route to the wells at Abou Klea. After a troubled night under fire in a defensive zeraba built of stone and thorn bushes, he ordered his troops to form a square, illustrated in Talbot’s article (Fig I). The Heavy Camel Regiment, made up from the 1st and 2nd Life Guards (1 Company), Royal Horse Guards and 2nd Dragoon Guards (2 Company), 4th and 5th Dragoon Guards (3 Company), Royal Dragoons and Scots Greys (4 Company), and 5th and 16th Lancers (5 Company) was deployed along the rear and around the left-hand back corner of the square. A Gardner machine-gun, manned by sailors under the command of Lord Charles Beresford, was towed along between the third and fourth companies, dividing the regiment into two wings.
Talbot described a slow advance of two miles, under heavy fire, ‘across steep hillocks of hard sand’. As the enemy’s sharpshooters began to pick off his men, one soldier being hit three times, he sent out skirmishers to deal with this threat. This was largely successful, though not before the Adjutant of the Heavy Camel Regiment, Captain Lord St Vincent, had been fatally wounded. Talbot also noted that, during the march, Beresford and others ‘expressed their anxiety’ about the integrity of the rear of the square. Strings of camels in the centre, carrying ammunition, water and litters for the wounded, were lagging behind. Although Talbot moved some of the Royal Dragoons and Scots Greys to fill a widening gap on the left face, he knew that this had ‘considerably weakened’ the rear of the square; and when the native camel drivers balked, ‘sidling and edging’ from enemy riflemen on the right, the left corner of the square began to disintegrate (Fig II). This was made worse when, on sight of a large enemy force ahead, the square was halted and then immediately moved to higher ground on the right, an action described by Talbot as ‘a simple movement for men, but difficult for camels, many of which remained outside the square ... among others, the one carrying the [wounded] Lord St Vincent.’
At this point, thousands of Arabs rose from the thick grass of a wooded ravine to the left of the British force and began their main attack. Talbot recorded that his men withheld their fire, to let the skirmishers back into the square. Major Byng of the 1st Life Guards was the last but one to make it, the man behind him being overtaken and speared to death. The Gardner gun, moved earlier to fill one of the gaps on the left flank, fired a few rounds before jamming, and its crew were swiftly killed or severely wounded. Talbot was in no doubt that the enemy then took advantage of the opening in the square, hurling themselves ‘with terrific rapidity and fury upon it’. He also acknowledged that this gap had been increased by the actions of Colonel Frederick Burnaby, who had wheeled out the 4th and 5th Dragoons from the rear of the square, ‘with the intention no doubt of bringing their fire to bear’ (Fig III). Talbot then vividly described the ensuing chaos:
‘... no sooner did he [Burnaby] see that, not only on our flanks, but on our rear, the attack was being developed, than he rode in front of the company and shouted to the men to wheel back. The order was obeyed, the men stepping steadily backwards. But before they had got back into their original place, the Arabs were in through the interval thus created and through the gap already existing at the left rear corner of the square. The Royals, Greys and Lancers ... were now attacked in rear by those of the enemy who had succeeded in passing the 4th and 5th Dragoons, [and] at the same time they were engaged (with the enemy) in front. A severe hand-to-hand fight ensued, in which the strength and determination of our men told, and not an Arab escaped alive. The affair was a matter of moments, and from first to last not more than five minutes elapsed.’
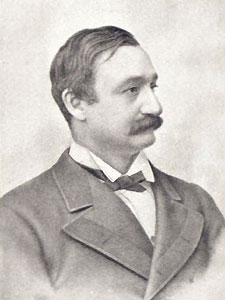
Fred Burnaby
|
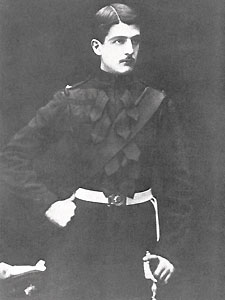
George Wyndham, Coldstream Guards - 1885 |
The rear ranks of both the Mounted Infantry and Guards Camel Regiments at the front of the square and the Sussex Regiment and the right wing of the Heavy Camel Regiment had also turned inwards to combat the enemy insurgence, although during this ‘indiscriminate firing’ many British soldiers lost their lives. (In a strange coincidence, Talbot also recorded that the Life Guards and Royal Horse Guards, stationed along the right rear of the square, were charged during the main attack by a squadron of Arabs mounted on black horses, an attack ‘repelled at once with volleys from their brethren of the Black Horse,’ which killed thirty animals on the spot).
In short, and in answer to the question as to how the Arabs had entered the square at Abu Klea, Talbot was adamant that ‘it was not closed up when the attack took place’ and that ‘it was not broken, because it was never properly formed.’ Of those who said that the Heavy Camel Regiment had been ‘clubbed’, he retorted that his men had fought ‘an Inkerman on a small scale - a soldiers’ battle,’ in which only ‘strength, determination, steadiness, and unflinching courage’ had stemmed the onslaught. And to those who had written accounts in which they thought the battle at moments lost, he retaliated by saying that this had never occurred to him, in evidence of which he had drawn neither his sword or pistol during the fight. Ironically, he also cited testimony from all the enemy’s written accounts of the battle, which stated their belief that the British had opened the square deliberately to encourage them inside, where they could then be slaughtered.
Among those killed at Abou Klea was Col Burnaby. Talbot and others recorded that he was seen fighting outside the square and ‘doing great execution with his sword,’ but when his horse was brought down, he apparently received ‘a mortal wound’ from a spear through his throat. Burnaby, forty-two at the time of his death, was well known in Victorian society, admired and revered for his legendary strength, military exploits, epic horseback travels across Asia, and a trip over the English Channel in a hot-air balloon. His death was marked by obituaries in many newspapers, the officers’ ball at the Household Cavalry’s barracks was cancelled, and even Queen Victoria mourned his loss in her diary. It is not surprising that an altogether more controversial version of Burnaby’s demise, discovered recently in a previously unpublished letter, was quietly suppressed. Writing to his mother from Alexandria in June 1885, George Wyndham, then serving with the British Army in Egypt, recalled a recent encounter:
Sergeant Slade of the Coldstream has been here invalided, from the Camel Corps, he is a very fine fellow and likely to get the V.C. for Abu Klea: his account is very interesting... At Abu Klea the heavy cavalry, some of whom as far as I can gather, were actually skirmishing!!, retired slowly on the face of the square completely masking its fire till the Arabs were quite close. Burnaby was outside and Sergeant Slade who had been with the skirmishers close to him. The heavy cavalry (all on foot you know) bulged inwards when the charge came. Burnaby called them every name under the sun and remained out, Slade says, fencing as if in a gymnasium until, he declares, he was shot by our men either to the right or left rear! Slade then lay on his stomach and crawled back into the square.
In the aftermath of the battle over 1,100 enemy dead were counted near the square. The British casualties amounted to 168 dead and wounded, of which 86 (or 50% of the total) were soldiers from the Heavy Camel Regiment. Talbot clearly felt the loss of his men keenly, for he later commissioned a memorial to be carved on an ancient Egyptian temple, then situated on the beautiful island of Philae, on the river Nile just south of Aswan. Beneath a large cross, the carved inscription reads: ‘In memory of 9 Officers & 92 NCOs & Men of the Heavy Camel Regt who lost their lives in the Soudan 1884-5.’ It then lists the casualties under their original regiments, dividing them between those who had been killed in action (74) and those who had ‘died of disease’ (28). [Note: There are a number of inconsistencies in the carving, not the least being that the memorial purports to be ‘in memory of 9 Officers,’ but actually lists the names of ten.]

British War Memorial, Philae
|
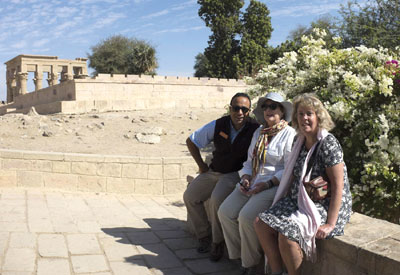
The author (right) at the Temple of Philae |
During the twentieth century the island of Philae was gradually flooded as successive dams were built on the Nile. Less than twenty-five years after it had been created, Talbot’s memorial had been submerged by the rising waters. In 1960 UNESCO embarked on a project to move the Philae monuments to the nearby island of Agilika. Over two years engineers, working within a specially constructed dam, dismantled the buildings into 40,000 sections, and then reconstructed them to within a millimetre of their original appearance. Fortunately, this painstaking work saved the Heavy Camel Regiment memorial and restored it to daylight after decades under water.
|
|