|
ABU KLEA REVISITED
by Drummer Alexander Bourne-May
The Honourable Artillery Company
|
Having been fascinated with the battles fought by the British in Sudan since I first saw the 1939 version of The Four Feathers, I was determined to take advantage of currently living relatively close by in Dubai by making a trip to the Sudan to visit the battlefields. Luckily for myself, the timing was extremely fortuitous and, following a very kind invitation from the current Defence Attaché in Khartoum, Lieutenant Colonel Edward Melotte, Irish Guards, I was able to join him and a small group of embassy staff and family members on a planned excursion to the battlefield at Abu Klea.
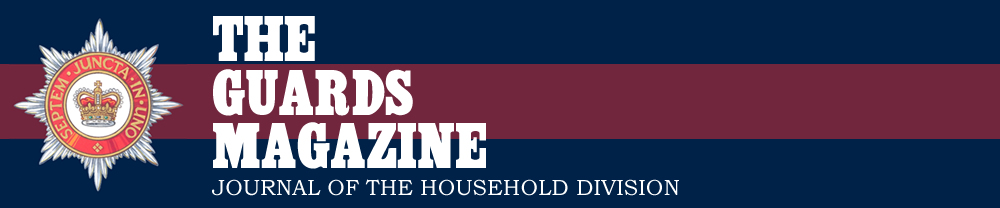
The site itself is remote, being an 8 hour drive north of Khartoum, mostly off-road and through open desert where, if you do chance across a small site of habitation, it is most likely you’ll see Sudanese villagers living and surviving in a way little changed to that of their ancestors at the time of the battle 131 years ago. When approaching Abu Klea and the battlefield, the surrounding countryside changes dramatically from flat desert to undulating ground of black stone which presents an almost lunar landscape.
 Lt Col Melotte walking towards the position of the Dervish advance on the British rear left (approximately where the photo is being taken from) Lt Col Melotte walking towards the position of the Dervish advance on the British rear left (approximately where the photo is being taken from) |
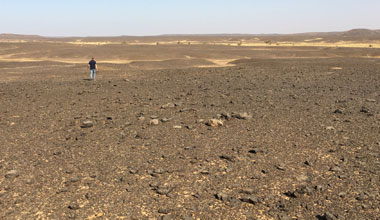
 The author at the Abu Klea memorial
 |
The battle itself took place on 17th January 1885 during the ill-fated campaign to relieve Major General Charles Gordon in Khartoum, and was to be the bloodiest engagement British forces fought on Sudanese soil. Whilst the main relief force, under the command of Sir Garnet Wolseley, was to travel up the Nile to Khartoum, a desert column commanded by Major General Sir Herbert Stewart was dispatched across the Bayuda desert as an advance force to Metemmah, from which a small number of troops would board steamers and proceed directly to Khartoum by river to provide support whilst the main force followed up.
The desert column consisted of the Camel Corps formed from four regiments: the Heavy Camel Regiment (including elements of 1st and 2nd Life Guards and The Royal Horse Guards), the Guards Camel Regiment (a composite body of Foot Guards and Royal Marine Light Infantry) plus the Light and Mounted Infantry Camel Regiments. In addition, the column included the 1st Battalion The Sussex Regiment and a detachment from 19th Hussars as well as three guns from the Royal Artillery and a Gardiner Gun (an early machine gun), manned by men of the Royal Navy.
The plan to cut across the desert from one stretch of the Nile to another meant that the column was totally reliant on the capture of certain wells in order to re-supply with water. One of these wells was situated within the Abu Klea wadi (a valley known as Abu Tulayh by the locals). Stewart was not expecting resistance at the wells, presuming that the Madhist forces would make their stand at Metemmah. It was therefore an unexpected shock when a large force of Dervishes was reported as sitting between the column and the wells on 16th January. The estimated strength of the Dervishes was 13,000 whilst the desert column consisted of approximately 1,400 men. Stewart prepared his force for an imminent attack on the afternoon of 16th January. The troops built a hasty fortification, known as a zariba, consisting of a square of stone two feet high which still exists to this day.
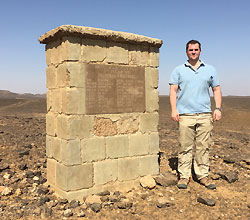
 Graves at Abu Klea. This is looking out from the position of the front left
of the square towards the initial Dervish attack. The cairn in the
distant left is thought to be Burnaby’s |
 Abu Klea memorial
 |
The attack by the Mahdist forces never took place but the British were continually harassed by Dervish sniper fire throughout the night and early morning. Once it became clear that the enemy attack would not materialise, at 10am on 17th January, Stewart ordered the column to advance in square formation in order to take the wells by force. The depleted state of the column’s water supply meant that there was no choice but to advance on the wells and succeed in their capture.
The wells themselves sit in the far end of the wadi, and the Dervishes anticipated that the British force would advance straight down the wadi, leading them into a perfect position to be ambushed by the Dervishes’ vastly superior numbers (this had been the case with previous victories over British-led Egyptian armies). However, Stewart chose instead to advance along the high ground running parallel to the wadi.
The battlefield today is unchanged (with the exception of a diminished number of trees in the wadi) and it is easy to follow the advance of the British square from their encampment, along the high ground towards the wells. The ground is rocky and uneven with a number of shallow ravines that create dead ground in which hundreds or indeed thousands of attackers could be concealed. Across this terrain the column advanced in square, knowing that its strength lay in keeping its formation solid, a task made all the more difficult by the slow pace of the camels, including those carrying the wounded from the previous day.
The column was harassed by Dervish sniping throughout its advance, with skirmishers from the Mounted Infantry sent out to deal with this threat as best they could. Although accounts and theories differ as to why, the rear left of the square lost its rigid formation, with elements of the Heavy Camel Regiment and the Naval Gardiner Gun effectively outside the protection of the now open square (as described in Samantha Wyndham’s excellent article on the subject in the Winter 2015/16 edition of The Guards Magazine).
At this point, after an advance of a mile and half, the front of the square crested a knoll that concealed between three and four thousand Dervishes. These warriors were of the Baggara tribe, renowned fighters who were viewed as the best of the Mahdi’s army. These warriors rose up and charged the front left corner of the square. In order to gain clearer fields of fire, the square hastily moved half right and halted on the top of a slight incline. The position was perfect except for a ravine which allowed the enemy a covered approach to within 180 metres of the square. However, it also gave the advantage of breaking their ranks as they charged. On the ground the battlefield seems to be an almost featureless open landscape, however, with the use of a few maps and books for reference, it is easily possible to work out the rough positions of the square to within 50 yards. The close proximity of the Dervish charge is striking. Once in position the square was within 100 yards of the Dervishes. Today the Abu Klea memorial marks the approximate spot where the front left of the square stood.
As the Dervishes advanced, the Mounted Infantry (on the front left of the square) opened fire, and as Bill Burge of the Guards Camel Regiment later described: ‘The sides of the square literally blazed with fire’. This fire was devastating, with no hope of reaching the square, the Dervishes soon began to falter. However, the rear left of the square was still in disarray and as some described it, the Baggara warriors wheeled, almost in a parade ground manoeuvre, under fire, and struck at the rear left of the square. This part of the square was occupied by the Heavy Camel regiment, because these were the men with the least experience when it came to fighting in square and had therefore been placed in the least exposed rear section. When the Dervishes struck, the 3rd Company of the Regiment (made up of men of 5th Dragoon Guards, along with the famed Colonel Fred Burnaby, Royal Horse Guards and the naval Gardiner Gun), were isolated and engulfed by the mass of Dervish warriors; many did not make it back to the square.
Soon a desperate fight developed with Baggara tribesmen breaking into the gap in the square and wreaking havoc within. The men of the Mounted Infantry as well as the rest of the Heavy Camel Regiment (including The Life Guards and Royal Horse Guards) had to turn and fire into the square as well as fend off tribesmen in bitter hand-to-hand combat.
Meanwhile the Guards Camel Regiment on the front right corner of the square was largely unaware, beyond the noise of fighting, as to what was happening. Once on the battlefield, one can appreciate that the size of the square and the rise and fall in the ground and the mass of camels in the centre would have obscured much of the view. Lieutenant Count Albert Gleichen of the Grenadier Guards (later to become a major general in the First World War) describes the point at which the guardsmen felt the impact of the Dervish attack into the rear of the square: ‘The camels inside the square obstructed all vision to the fighting flank, and we had already concluded that the fire of the Heavies and Mounted Infantry had swept back the Arabs, when suddenly a terrific shock was felt, accompanied by redoubled yells and firing. I found myself lifted off my legs amongst a surging mass of Heavies and Sussex who had been carried back against the camels by the impetuous rush of the enemy’.
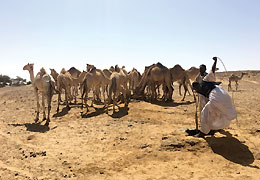 Camel herders using one of the Abu Klea wells
 |
After 15 minutes of pitched battle the British had reformed the square, and succeeded in repulsing the Dervish attack with Gleichen describing the fighting as ‘swarms of Arabs in desperate hand-to-hand fight with our men, hacking, hewing, hamstringing and yelling like black devils on a ground literally piled with the dead and dying’. The British were only saved from disaster by the discipline of the soldiers on the front and right ranks of the square, including the Guards Camel Regiment, who held fast and were able to fire successive volleys on the Dervishes who had broken into the British formation.
No Dervishes that entered the square were left alive. The vast majority of the 74 British fatalities of the day were incurred at the rear left of the square and came from the Heavy Camel Regiment and the naval crew of the Gardiner Gun. Amongst them was Colonel Burnaby who was mortally wounded and died within minutes of the repulse of the Dervishes. Approximately 1,100 Dervishes lay dead on the battlefield.
With the repulse of the Dervishes the square prepared for another attack, but it never came. Instead the incessant sniping which had occurred for much of the morning continued. Whilst the Guards Camel Regiment had not taken any serious casualties during the Dervish attack, after the battle Gleichen described the point that one of his men was hit by a Dervish bullet ‘One of our best men (Ormiston, 3rd Grenadiers) was shot by one of these brutes. As he was handing his water bottle to another man a bullet passed through his friend’s hand and pierced his chest. He fell on to me, a torrent of blood gushing out of his mouth. No use trying to staunch it; he was dead in less than a minute’.
With time the Dervish fire melted away and the British began to collect weapons, tend to the wounded and bury their dead. There are a large number of graves at the battlefield to this day. It is unclear whose graves they are, but it is thought most likely that they are mainly Muslim, with several accounts claiming the British buried their dead in a mass grave outside the square. It is said that the largest cairn visible at the battlefield is that of Burnaby’s, because every soldier of the column placed a stone on it as they moved off the battlefield.
The graves and the memorial to the British dead which stands on the site are not the only evidence of the fighting that took place here. Our party was also able to unearth half a dozen spent Martini Henry cartridge cases in as many minutes. This is a site that is rarely visited and one that remains all but untouched since the events of 17th January 1885.
Once ready to move, the column descended into the wadi, reaching their objective, the wells, at 5pm. These are now a collection of approximately 40 small sink holes, and not so easily identified. They are still used by the locals, and we were fortunate to come across two camel herders watering their livestock at one of them.
The men of the desert column went on to endure a freezing and restless night at the wells followed by a difficult forced march to Metemmah through the night of 18th January. The force faced another day of harassing fire whilst camped overlooking the outskirts of Metemmah which resulted in the mortal wounding of Major General Stewart. This was followed by another battle fought in square on 19th January, the Battle of Abu Kru, which, although by no means an easy fight, went off without the complications and casualties of Abu Klea. As a result, the force occupied Metemmah and a relief force from the Royal Sussex Regiment was dispatched to Khartoum. However, it was ultimately too late, arriving in Khartoum on 28th January. Khartoum had fallen two days before and Gordon had been killed, bringing to an end the 1885 campaign. It was not until 1898 at the Battle of Omdurman that the British (amongst them 1st Battalion Grenadier Guards) would finally defeat the Mahdi’s successor, the Khalifa, and take Khartoum thus restoring British honour.
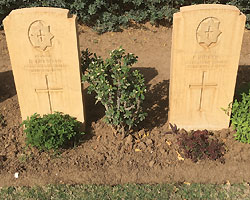 Coldstream graves in the
CWGC cemetery Khartoum |
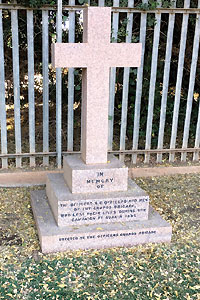 The 1885 Guards memorial in the
CWGC cemetery Khartoum |
In Khartoum and Omdurman today a number of sites still exist from the days of Gordon and the Battle of Omdurman, providing evidence of the Mahidist campaigns fought by the British. There is also a Commonwealth War Graves Commission site in Khartoum, created in 1960 and bringing together a multitude of graves that had been scattered across pre-independence Sudan. In the cemetery a memorial can be found to the officers and men of the Guards Brigade which fought in the Suakin campaign of 1885. In addition, there are the individual graves of Guardsmen killed, both in the 1885 campaign as well as those of Coldstreamers stationed in the country in 1909 and 1932. The lovingly maintained cemetery provides a permanent reminder of the British military involvement in the country and the part that officers and soldiers of the Guards regiments played during those campaigns. |
|